QUICK LINKS

info@howtocraftnetwork.com
We just got smarter - shop and watch with the SBM appGET THE APPWatch us live on your smart TVSEE HOWDiscover our dedicated IPTV channel - go to my-telly.comWATCHCollect loyalty points on every orderFIND OUT MORE
Welcome to the How to Craft Network
 
SBM SHOP
FOLLOW US
GIVE YOUR FRIENDS $10 OFF REFER A FRIEND › DISCOVER MY-TELLY.COM › WE JUST GOT SMARTER GET THE APP › AWARD WINNING CHANNEL ON YOUR TV › JOIN THE CLUB FOR SAVINGS ›
 
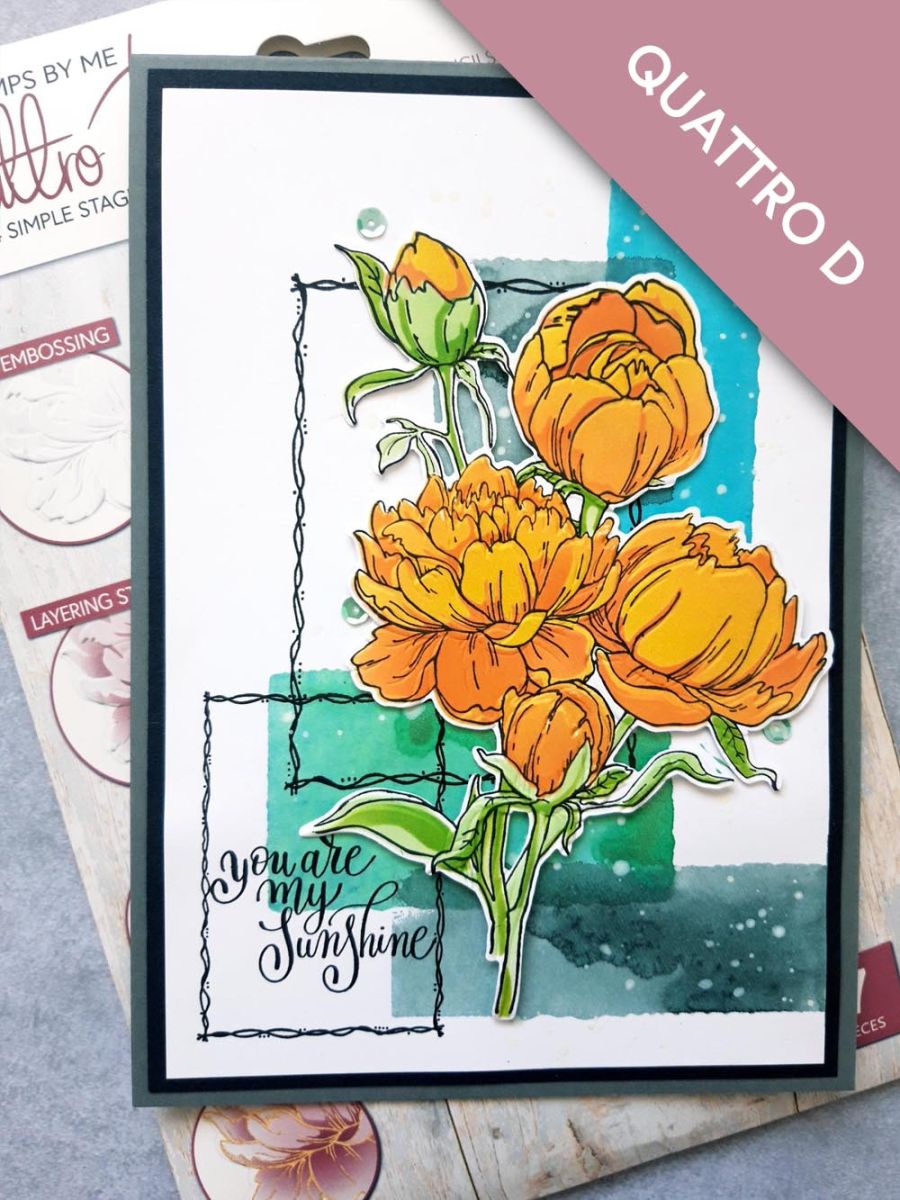
You Are My Sunshine
How to guide · 15 steps

You Are My Sunshine

3 October 2022✦ Toni DarrochDie CuttingDistress InkEmbossing FoldersInk TechniquesStamping TechniquesStencils
15steps
Step 1 of 15

Everything you need

0 of 21 ready
The list
From your craft stash
Tick what you have - this device remembers.

Step by step

tap a picture to see it big · tap DONE as you go - this device remembers
Step 1 of 15

Place stencil 1 on to the white card cut to 7 x 5".

Blend the Squeezed Lemonade Oxide through the stencil, then apply the Spiced Marmalade around the outer edges only. 

TIP: If you are unsure how to line up the stencils, apply a little ink through each of the corner hearts, then every time you swap a stencil, line up the hearts. 
Step 2 of 15

Place stencil 2 in position and blend through with the Worn Lipstick Oxide.  

Step 3 of 15

Line up stencil 3 and apply the Cracked Pistachio. 

Step 4 of 15

Having lined up stencil 4, blend with the Mowed Lawn. 

TIP: You can go back in with more colour, at any time. Just swap the stencils over as required. 

Step 5 of 15

Ink up the coordinating stamp, with the Onyx Black Versafine and stamp over your stencilled image. 

Step 6 of 15

Secure the coordinating die in place over your stamped image, with low tack tape.

Run it through your die cutting machine. 

Step 7 of 15

Place inside the embossing folder, with the raised, embossed side at the bottom and run it through your machine. Make sure you have the correct plates to emboss with...

Set your die cut Peonies to one side. 

Step 8 of 15

Create an acrylic block background on the white card 7 1/4 x 5". 

To achieve this, spray one of the Izink sprays on to an acrylic block, spritz lightly with water and press down on the right hand side of the card. Wait a few seconds for the card to "drink" the ink, then carefully lift it off. Repeat this step several times, with different coloured sprays and sized blocks, until you are happy with your background. Ensure you take your inked layout just off the right hand edge of the card. 

Step 9 of 15

Ink up the 2 smallest frames, from the Dot Frame Stamp Collection, with the Versafine.

Using your die cut Peonies as a guide, stamp your frames as shown here.

NB: Your sentiment will be stamped in the smallest frame, so ensure it will be visible once you adhere your Peonies in place. 


Step 10 of 15

Ink up the sentiment stamp, with the Versafine and stamp within the smaller frame. 

Step 11 of 15

Add water to the Confetti Ink and use your paint brush to splatter the ink over your artwork, as required. I like lots of splats!! 

Dry off your artwork, before proceeding to the next step. 

Step 12 of 15

Adhere your artwork on to the black card. 

Step 13 of 15

Adhere on to the front of your grey, top folding card blank. 

Step 14 of 15

Adhere your die cut Peonies on to your artwork, using foam pads for added dimension. 

Step 15 of 15

To finish, add sequins on, around and tucked under your artwork. 

You made it!

Share your make with the Stamps By Me community - and keep this guide for next time.

⇩ DOWNLOAD THE PDF

More die cutting guides

all the guides ›

Prefer the previous layout? Open the old page.